kirbyBOOK is the definitive solution to publishing web based books easily.
Features
Simple to publish. Publish, update and maintain your book easily via the integrated Panel or by using your favorite text or markdown editor. Throw in some Kirbytext (similar to WordPress shortcodes) to spice up your content even more.
Awesome reading experience. Make your book available in a fully-responsive way optimized for both desktop and mobile reading experiences. Let your readers choose between multiple themes, fonts and text sizes.
Based on Kirby. With the help of Kirby you set up your book on top of a well-proven file-based content management system. No hazzle with managing databases and performance drops. Backups are dead-simple.
Ready for your content. Add any kind of content you like. Create multiple chapters containing several articles each. Add images, tables, footnotes. Embed Youtube and Vimeo videos, Tweets and a lot more.
ePub download. Let your readers download a copy of your publication in the well-proven ePub format with simply enabling a checkbox. Everything will be handled for you.
1. Setting up kirbyBOOK
Setting up kirbyBOOK is quite easy and can be done by anybody. Everything you need is already included in the download.
Unzip the downloaded theme files.
Upload them to your webhost.
Point your browser to http://yournewsite.com/panel.
1.1. Installation
Installing kirbyBOOK is really easy. Since it has been crafted on top of Kirby CMS it doesn't need any sort of database setup at all. Just copy the files to your server and you're good to go.
Unzip the downloaded theme files package.
Upload everything to your server (make sure to include the invisible .htaccess file).
Point your browser to http://yournewsite.com/panel and use the included installer to create your first user account.
This is really all it takes to get up and running with a basic kirbyBOOK powered publication.
Please remember that Kirby CMS is not free. If you use this theme on a public website, don't forget to buy a license for Kirby (currently from €15,- / $17,-).
1.2. Configuration
kirbyBOOK offers quite a lot of configuration and customization options within the so called Site Options. To access these, click the Menu icon at the top left of the panel and choose Site Options.
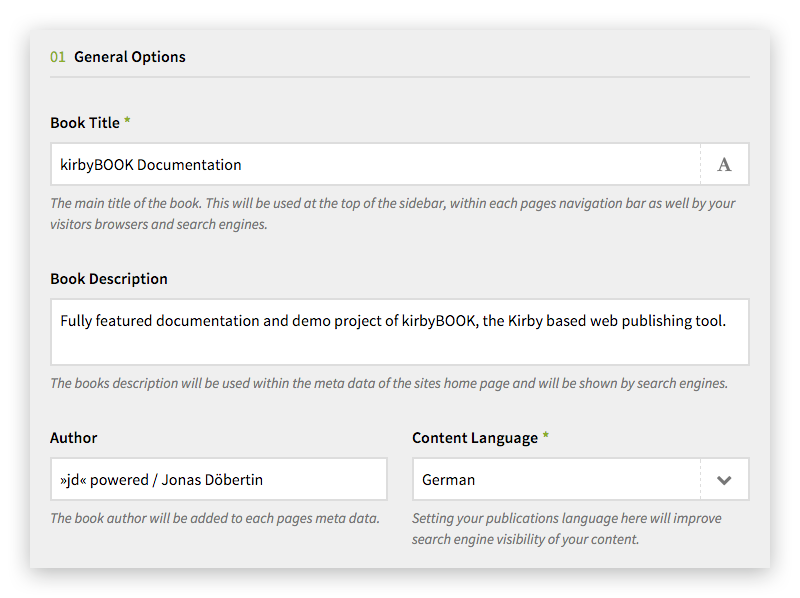
General Options
Book Title
The main title of the book. This will be used at the top of the sidebar, within each pages navigation bar as well by your visitors browsers and search engines.
Book Description
The books description will be used within the meta data of the sites home page and will be shown by search engines.
Book Author
The book author, again, will be added to each pages meta data.
Content Language
Set your publications language here. This will improve search engine visibility of your content. Learn more.
Please note that filling in the Book Description and Book Author fields is optional but strongly recommended for search engine visibility puposes.
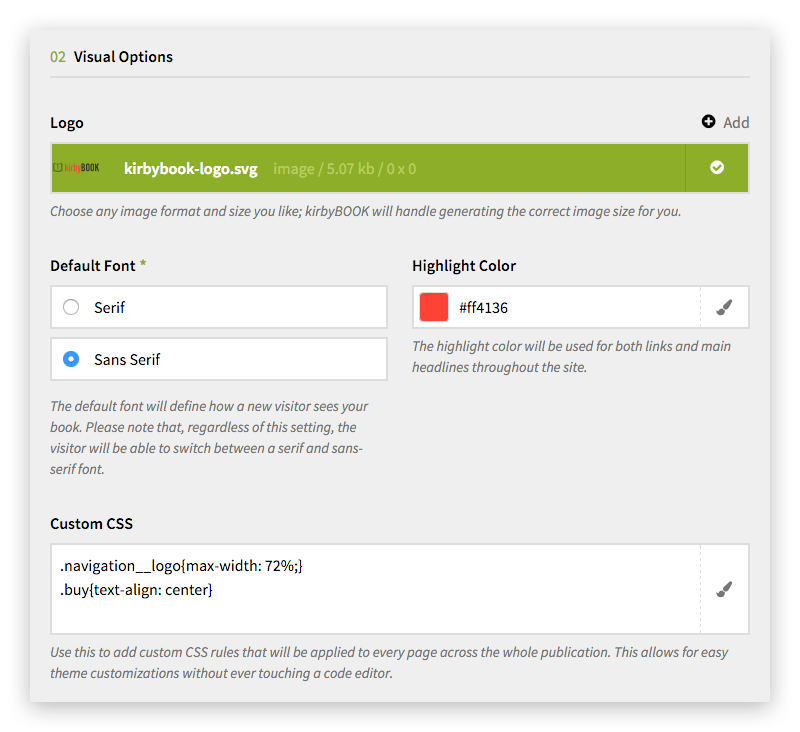
Visual Options
Logo
Your logo will be added at the top of the navigation sidebar. Choose any image format and size you like; kirbyBOOK will handle generating the correct image size for you.
Highlight Color
Choose a color to be used as highlight color. It will be used for both links and main headlines throughout the site.
Default Font
As you may have noticed, kirbyBOOK let's the visitor choose between a serif and a sans-serif font. With this option you can choose your sites default font that will be shown to new visitors. Please note that, regardless of this setting, the visitor will be able to switch between a serif and sans-serif font.
Custom CSS
Use this to add custom CSS rules that will be applied to every page across the whole publication. This allows for easy theme customizations without ever touching a code editor.
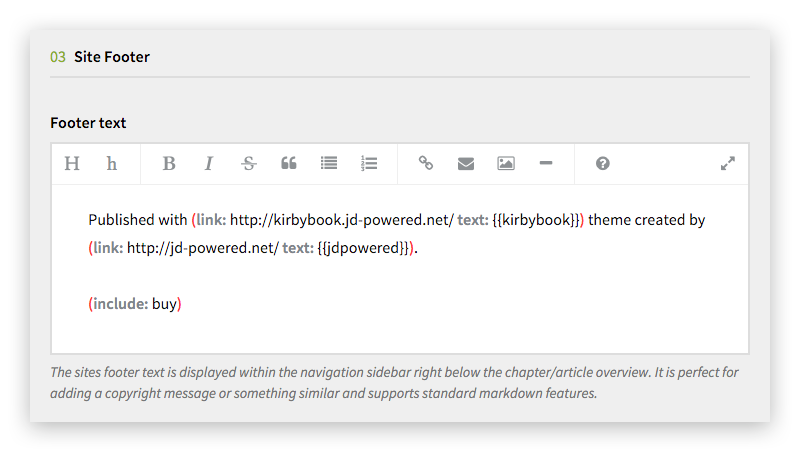
Site Footer
Footer Text
The sites footer text is displayed within the navigation sidebar right below the chapter/article overview. It is perfect for adding a copyright message or something similar and supports standard markdown features.
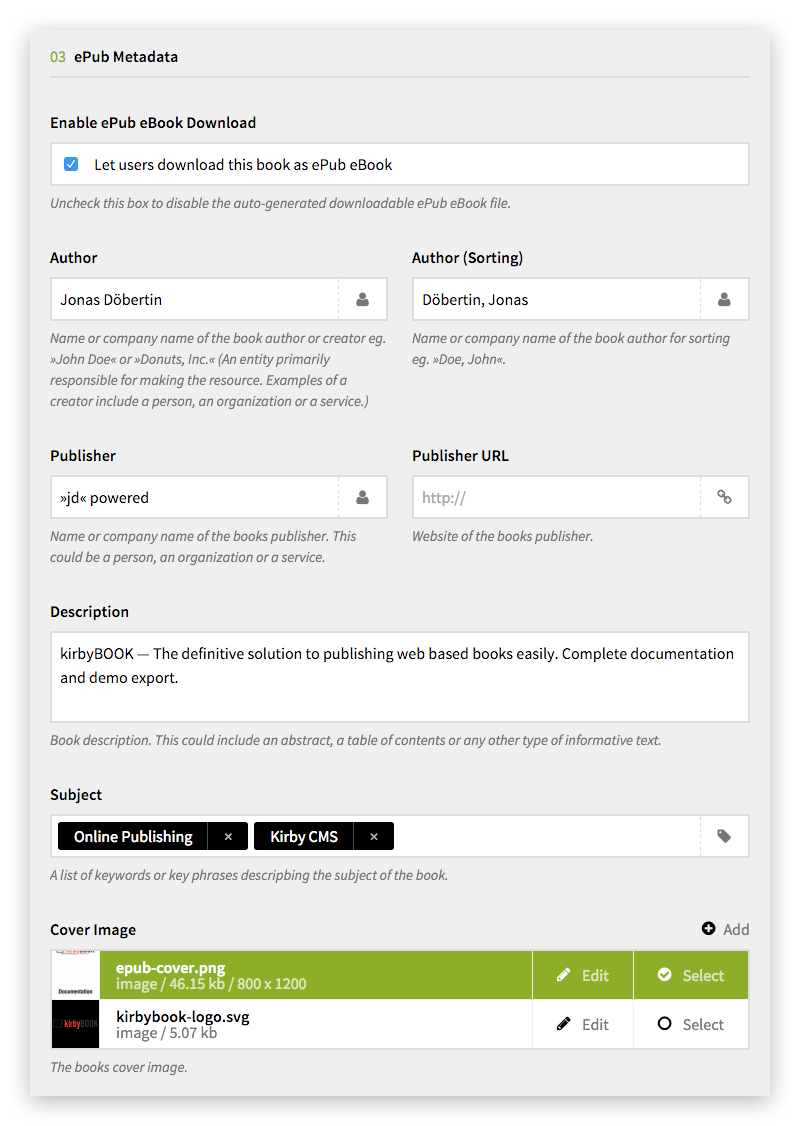
ePub Metadata
First introduced with Update 1.1.0kirbyBOOK lets your readers download your publication as a convenient ePub eBook file.
Enable ePub eBook Download
Unchecking this option will completly disable the ePub feature and remove the "Download as ePub" link from the sites »Print« menu.
Author
Each ePub file may contain specific information about the other of the book. This (and the »Author (Sorting)«) options lets you specify the eBook author independentely from the main book author used for HTML meta data. this first firld should contain the authors name or a company name in its natural writing eg. »John Doe« or »Donuts, Inc.«.
Author (Sorting)
This second author field should contain the author name in a sorting enabled writing like »Doe, John«.
Publisher
Use this option to add a name or company name of the books publisher. This could be a person, an organization or a service.
Publisher URL
Enter the publishers website URL.
Description
An ePub file may contain a short book description. This could include an abstract, a table of contents or any other type of informative text. Use plain text only.
Subjects
Add a list of keywords or key phrases that describe the subject of the publication.
Cover Image
Choose an image that shall be used as the books cover. Please note that not all eBook readers will display cover images.
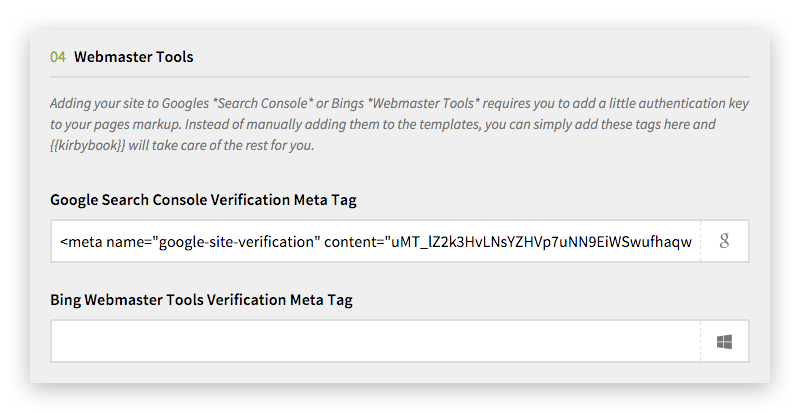
Webmaster Tools
Adding your site to Googles Search Console or Bings Webmaster Tools requires you to add a little authentication key to your pages markup. Instead of manually adding them to the templates, you can simply add these tags here and kirbyBOOK will take care of the rest for you.
Google Search Console Verification Meta Tag
Enter your Google Search Console verification meta tag. Make sure to add the complete tag, not just the ID.
Bing Webmaster Tools Verification Meta Tag
Enter your Bing Webmaster Tools verification meta tag. Make sure to add the complete tag, not just the ID.
Advanced Options
The Advanced Options section contains another set of options that might come in handy even though not everybody will need them. They offer great ways to add extended functionality to your publication without the need to fire up a code editor.
Favicon/Meta Tags
Enter all your favicon related markup or other meta tags here. Pro-Tip: A great tool to create your favicon images and the necessary code is Real Favicon Generator.
Tracking Code
If you want to use some sort of web analytics software like Google Analytics or Piwik, this is the place to add your tracking code. kirbyBOOK will make sure it is loaded right before the closing </body> tag.
Custom JavaScript Code
Use this to enter any additional JavaScript code snippets here. Make sure to include all the <script> tags.
1.3. Publishing Non-English Books
kirbyBOOK gives you the freedom to publish your book in any language you want.
Setting the content language
If you choose to publish your book in a language other then English, you should visit the Site Options and set the Content Language setting accordingly. This will a) tell search engines what language your book is published in and b) tell kirbyBOOK to load the respective theme translation (button/icon hints, Dashboard links, etc.), if available.
kirbyBOOK currently includes theme translations for the following languages:
English
German
Translating the theme
If you want to use kirbyBOOK with a content language that's not included in the above list you may want to add the theme translation yourself. When you don't add a corresponding theme translation, kirbyBOOK will just fallback to default English texts nicely.
To add a theme translation you have to create a new translation file for your language. The easiest way to do so is to copy an existing translation and change all the texts accordingly. Don't worry though, this is really easy:
Find the default translation file site/languages/en.php
Copy and rename it to your desired languages ID (eg. de.php or fr.php)
Open the newly created file in a text editor of your choice and translate all the texts.
That's it. kirbyBOOK will use the texts you provided from now on.
2. Adding Content
Since kirbyBOOK is build on top of Kirby CMS managing your books content, chapters and articles is dead simple. You could even do with nothing more then a basic text editor.
The following pages will give you a comprehensive overview of adding and managing chapters and articles inside your online publication.
2.1. Creating Pages
Each kirbyBOOK powered publication consists of a variety of pages and subpages. These pages and subpages are made up of page types called "Chapters" and "Articles".
Chapters & Articles
Generally, chapters and articles are very similar. In fact, both page types allow you to add the same type of page content with exactely the same Markdown and Kirbytext support. The only difference is that a chapter may contain any number of articles as subpages while articles can't contain any further articles. This allows for a better content breakdown and helps automatically defining the left hand navigation menu.
Of course an article does not necessarily have to be put into a chapter. You may also create standalone articles that are not added to a chapter and live on their own (see the Purchasing and Help pages as examples).
Creating a new page
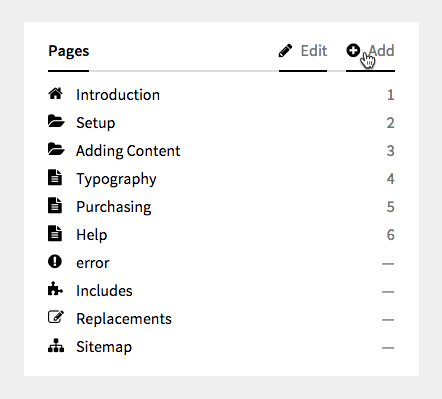
To create a new page you have to navigate to your site Dashboard. If you want to add a new root level page (whether it's a chapter or an article), simply click the Add button in the Pages section.
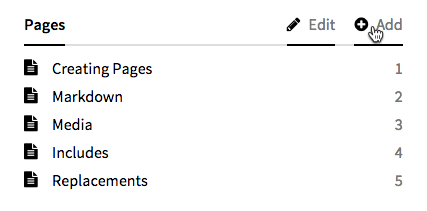
If you however want to add an article to an already existing chapter, first click the chapters name to change to its dedicated Dashboard page. Then, from the Pages section in the sidebar choose Add.
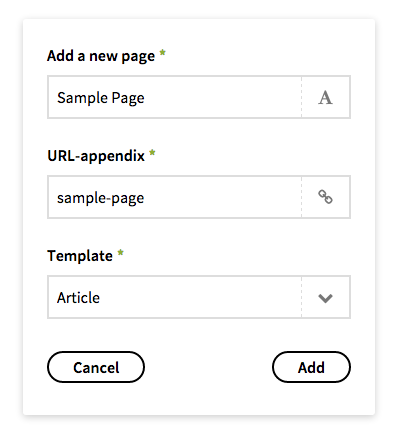
After clicking the Add button, a modal window will pop up asking you for the new pages name, its URL-appendix and a template. Enter a name, maybe modify the autogenerated appendix and choose a template (in some situations there may be only one option to choose from).
Page Content
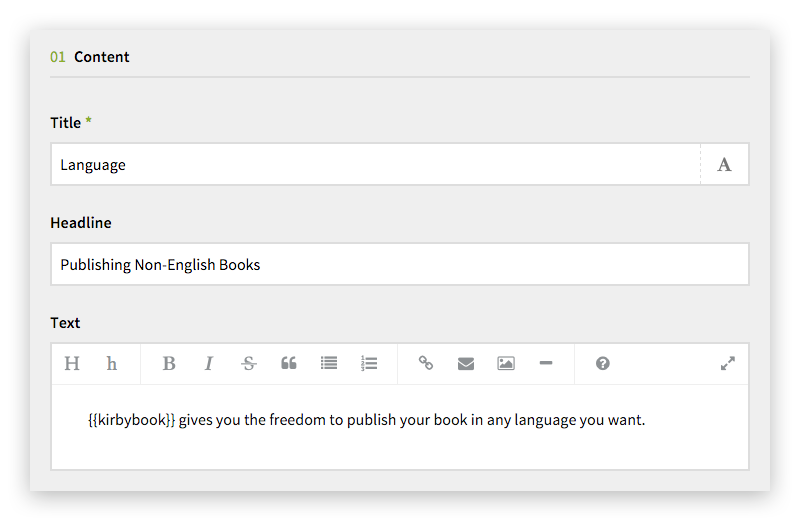
After creating a new page, you'll be taken to the newly created pages dedicated Dashboard page. There you can add the pages title and headline as well as its text content.
Title
The pages title will be used within the navigation menu.
Headline
Specifying an optional headline lets you set the pages headline independently from its title. This is nice for headlines that would be to long to be used in the navigation menu.
Text
This is where you add the pages content. You may use all supported Markdown and Kirbytext features (see all available Typography) as well as Includes and Replacements.
Page Options
In addition to the main content, each page has a small set of options that allow you to control various aspects of its behaviour.
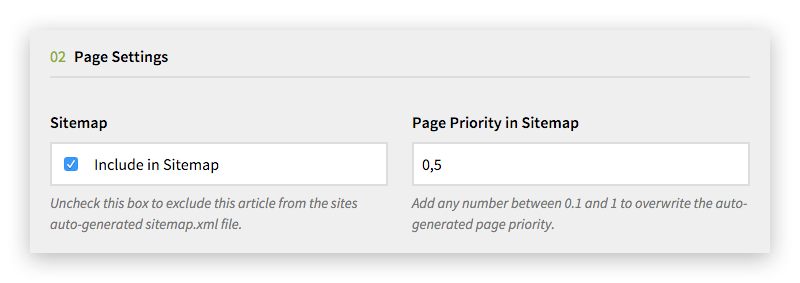
Page Settings
From this section you can choose if a page will be added to the sites autogenerated XML sitemap. In addition to that, you may also overwrite the pages default sitemap priority.
Include in Sitemap
By disabling this checkbox you can remove the page from the autogenerated xml sitemap completely. Rechecking the checkbox will added back immediately.
Sitemap Priority
By default, a pages sitemap priority is calculated based on how deep it is nested within other pages (1 / <page depth>). You can overwrite this value by setting this option to any number between 0.1 and 1.
Advanced Options
This section includes an option that should only be used by
Custom CSS
Use this to add custom CSS rules that will be applied to this page only. This allows for special per-page stylings.
2.2. Formatting Text
When it comes to defining the actual content, Kirby uses a custom flavor of John Grubers Markdown syntax, called Kirbytext. Kirbytext is a simple yet powerful syntax to format text, that is easy to understand and to read.
Kirbytext inherits all basic Markdown features and extends them with simpler and more powerful tags for adding images, embedding videos or including download links for files.
On top of that, kirbyBOOK adds some additional Kirbytext tags that make embedding multimedia content and setting up reusable text snippets ever easier.
If you want a more to-the-point overview of formatting your content with Markdown and Kirbytext you can have a look at the Formatting text article from the Kirby docs.
Markdown Extra
In addition to plain Markdown, kirbyBOOK supports some more advanced features, called Markdown Extra, that are specifically relevant to book-like publications: tables and footnotes. Have a look at the Typography page to see how to add tables and footnotes and how they are styled.
Custom Kirbytext Tags
kirbyBOOK comes with some additional Kirbytext Tags that extend the available features even further. The main custom features are:
oEmbed support that allows you to embed Youtube & Vimeo videos, Tweets, Vines, Gists and more without writing any kidn of HTML code
Embedding various media objects like Youtube videos, Instagram pictures, Vines or Tweets is as easy as it could possibly be. The reason for this is a custom Kirbytext Tag (similar to a WordPress Shortcode or BBCode) that kirbyBOOK provides out of the box.
To add one of the various supported media objects to your page, all you need to do is to use the (embed) Kirbytext tag and add the url of the object you would like to embed to it.
Here are some highlights of the long list of sites you can embed from (full list):
Amazon
Dribbble
Flickr
gfycat
GitHub
Imgur
Instagram
Kickstarter
PollDaddy
SoundCloud
Spotify
Twitch.tv
Vimeo
Vine
Wikipedia
YouTube
To make using oEmbed as painless as possible, kirbyBOOK heavily relys on a service called Embedly Cards. It takes your media urls and generates the beautiful and responsive embeds you like so much asynchronously (without affecting page load times).
Options
When using the(embed) Kirbytext tag, there is a small set of options you can use to customize the display of the embedded images/videos/articles.
Includes are a convenient way for reusing content portions across multiple places of your publication. They are optimal for storing large and confusing table definitions outside of your main content while making them easily editable. They are also great for storing text that will be used at multiple places within your content, such as license texts, copyright notices, system requirements, call-to-action buttons, etc.
In fact, this demo site uses an Include to for the "Buy now!" button code so it can be easily dropped in anywhere.
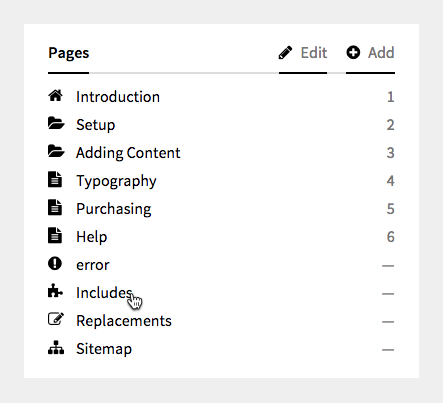
Prepage an Include
Before you can add an Include to your content you need to create it. From your site Dashboards Pages section, choose Includes. This is the central place all your includes will be stored at conviniently.
From the Add your Includes section, choose Add to create a new Include. Add an Include indicator and your Include text. You may use any Markdown or Markdown Extra features of your liking. Everything that's available to regular pages is available here, too.
One thing to note: after defining new Includes make sure to scroll down all the way to the bottom of the page and hit that big Save button. Otherwise you newly added Includes may be lost.
Using an Include
Importing an include is really easy using the include Kirbytext tag:
( include: copyright)

 ↑ Make sure to remove this space character when copy & pasting…
One thing to keep in mind is that
Recursive Includes
Please note that recursive includes and sub-includes are not supported right now. In easy words that means your includes can't contain other includes.
2.5. Replacements
Replacements are a great way to apply consistent styles to any number of occurances of a word (or a number of words) across the whole site and to make editing the styles a breeze. They also offer a great way of adding consistent icons to your content without repeating the required code over and over again.
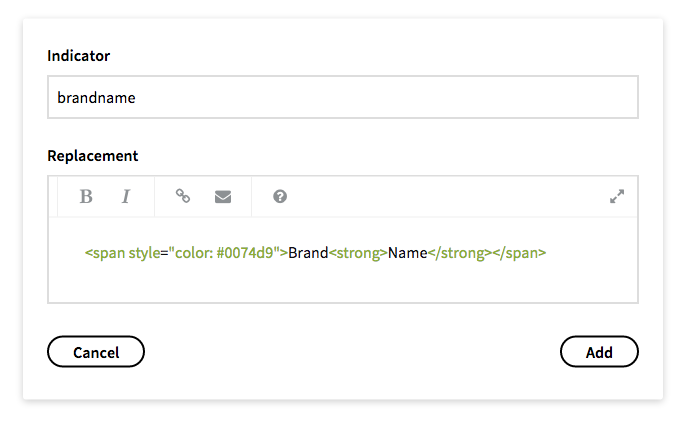
Let's say you have multiple occurances of your brands name in your content and you want to add a destinctive style to them so every mention of the brands name looks like BrandName. This style is created by adding <span style="color: #0074d9">Brand<strong>Name</strong></span>. While surely you could just add this code everywhere your brand name should appear, using a {{brandname}} Replacement has some advantages.
Say you want to change the style of your brand later on. Without the use of a Replacement, you'd have to find every single occurance of the code and replace it with the new one. This can be quite time consuming and frusttrating. With a Replacement however, all you need to do is to change a single Replacement definition and all occurances of your brands name are updated automatically for you.
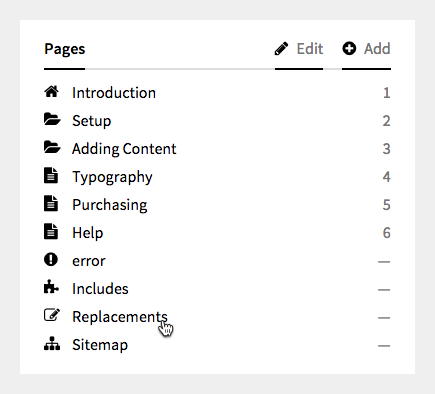
Prepare a Replacement
First you need to set up your replacement or, in other words, make it known to kirbyBOOK. From your sites Dashboards Pages section navigate to Replacements.
From the Add your Replacements section, choose Add to create a new replacement. Add a replacement indicator and your replacement text. The replacement text can include any markdown or HTML formatting you'd like.
One thing to note: after defining new replacements make sure to scroll down all the way to the bottom of the page and hit that big Save button. Otherwise you newly added Replacements may be lost.
Add a Replacement to Your Content
After setting up the replacement you're good to go to use it within your content. Just add the replacement indicator (wrapped with curly braces) averywhere you want your styled brand name to appear: {{brandname}}. kirbyBOOK will handle replacing the indicator with the actual code for you.
3. Available Typography
General Styles
Paragraph: Lorem ipsum dolor sit amet, consetetur sadipscing elitr, sed diam nonumy eirmod tempor invidunt ut labore et dolore magna aliquyam erat, sed diam voluptua. At vero eos et accusam et justo duo dolores et ea rebum. Stet clita kasd gubergren, no sea takimata sanctus est Lorem ipsum dolor sit amet. Lorem ipsum dolor sit amet, consetetur sadipscing elitr, sed diam nonumy eirmod tempor invidunt ut labore et dolore magna aliquyam erat, sed diam voluptua.
Strong: At vero eos et accusam et justo duo dolores et ea rebum. Stet clita kasd gubergren, no sea takimata sanctus est Lorem ipsum dolor sit amet.
Italic: Lorem ipsum dolor sit amet, consetetur sadipscing elitr, sed diam nonumy eirmod tempor invidunt ut labore et dolore magna aliquyam erat, sed diam voluptua.
Strikethough: At vero eos et accusam et justo duo dolores et ea rebum.
Stet clita kasd gubergren, no sea takimata sanctus est Lorem ipsum dolor sit amet. Duis autem vel eum iriure dolor in hendrerit in vulputate velit esse molestie consequat, vel illum dolore eu feugiat nulla facilisis at vero.
Lists
Unordered list
List Item
List Item
Subitem
Subitem
Subitem
List Item
List Item
List Item
Ordered list
List Item
List Item
Subitem
Subitem
Subitem
List Item
List Item
Definition list
Definition
Explanation
Definition
Explanation
3.1. Multiple Columns
With kirbyBOOK you can create flexible, responsive and fully-featured multi-column text blocks easily by simply wrapping your content with a set of custom Kirbytext tags.
To set up a multi-column layout text block just wrap the content you want to be layed out in columns with (columns…) and (…columns) and separate each columns content with ++++. You may create layouts with up to three columns.
With each columns content you may use all other types of Markdown and Kirbytext formatting options (see Updates » Version 1.0.1 for example).
Example: two column layout
Column A Content
Column B Content
(columns… ) ⟵ Remove space character here

Column A Content

++++

Column B Content

(…columns ) ⟵ Remove space character here
Example: three column layout
Column A Content
Column B Content
Column C Content
(columns… ) ⟵ Remove space character here

Column A Content

++++

Column B Content

++++

Column C Content

(…columns ) ⟵ Remove space character here
3.2. Tables
Based on Markdown Extra, kirbyBOOK has its own syntax for simple tables. A “simple” table looks like this:
You can specify the alignment for each column by adding colons to separator lines. A colon at the left of the separator line will make the column left-aligned (default); a colon on the right of the line will make the column right-aligned; colons at both side means the column is center-aligned.
Every good book needs a little footnote here and there.1 A footnote is made of two things: a marker in the text that will become a superscript number and a footnote definition that will be placed in a list of footnotes at the end of the document. A footnote looks like this:2
Every good book needs a little footnote here and there.[^1]

[^1]: Yes, it most certainly does!
kirbyBOOK is available for purchase right from this website (just click that big'ol Buy now! button above). Payments are handled nice and securely via Gumroad. They'll also take care of delivering all future updates right to your inbox so you'll never miss out on any new features.
What is included?
When it comes to purchasing kirbyBOOK, you'll get to choose between two versions:
A standard ready-to-use edition that you can upload to your webhost without any further ado.
A developer edition for advanced users which includes all source files for esier customization.
Each license you purchase is valid for a single website (of course you may create as many local development/testing installations as you like). If you want to use kirbyBOOK on multiple websites or domains, you may choose the number of licenses you need during the checkout process. If you need a lot of licenses (6 or more) drop me a message at support@jd-powered.net to talk about and arrange volume discounts.
Files
Standard Edition
Developer Edition
Kirby Core
✓
✓
Kirby Panel
✓
✓
Theme Files
✓
✓
Demo Content
✓
✓
JavaScript Source Files
—
✓
SCSS Source Files
—
✓
Git Configuration Files
—
✓
NPM Package Files
—
✓
Bower Package Files
—
✓
Gulp Workflow
—
✓
Composer Package Files
—
✓
PHP CS Fixer Configuration Files
—
✓
Please keep in mind that, similar to other Kirby themes on the market, kirbyBOOK doesn't include a Kirby CMS license. It needs to be purchased seperately (currently from €15 / $17).
Standard (ready-to-use) Edition
The standard Edition includes all required theme files, assets and the complete set of demo content (as seen on this website). Everything is nicely prepared and embedded into a fresh, preconfigured and up-to-date Kirby installation.
This edition was made especially for non-code oriented people that just want to start publishing their book with kirbyBOOK without having to worry about any tweaks, modifications, customizations, compiling, etc…
Developer Edition
In addition to the Standard Edition you may choose to get a hold on the special Developer Edition. Choose this edition if you want to make your own heavy modifications or customizations to kirbyBOOK. In addition to the Standard Edition the Developer Edition includes:
all uncompressed and well-documented JavaScript and Sass source files
Composer, Bower and Npm package files to install all vendor assets required for development
The complete Gulp workflow for compiling the assets
Additional configuration files that enable you to use a complete Git-based workflow, including .gitignore and .gitmodules.
5. Updates
5.1. Version 1.0.1
The updated version 1.0.1 contains mainly…
Highlights
Updated "Print" button functionality: Clicking the print button now shows a dropdown that lets you choose from either printing the complete book or the current page only.
Multi-column text layout: Adding responsive multi-column text blocks is a breeze with the new columnKirbytext tag.
Additional changes and bugfixes
Fixed elastic scrolling on iOS devices
Nicer underlines for hovered links
Opening one dropdown now closes the others
Updating
Replace your old /assets and /site directories with the ones from the update.
The updated version 1.1.0 adds the new »Download as ePub« feature, upgrades kirbyBOOK to Kirby CMS 2.2 and contains various small fixes.
Highlights
ePub download: Let your readers download a copy of your publication in the well-proven ePub format by simply enabling a checkbox in the site options. Everything will be handled for you.
Faster browsing experience: With the help of a little PJAX magic browsing a publication powered by kirbyBOOK is faster then ever before.
Improved media embedding: A new and improved way of adding mutimedia objects like Vimeo and YouTube videos, tweets, vines, etc. to your content makes this feature a lot quicker and more powerful.
Kirby 2.2: Take advantage of the new features Kirby 2.2 brings. This includes the completly rewritten Panel which makes managing your content even more easy.
Additional changes and bugfixes
Choose to exclude the Introduction page from the chapter/article numbering
Use keyboard arrows to navigate between pages
Optimized gulp task structure and javascript compiling workflow
Updating
Make a backup of your old /content directory.
Replace all old files and folders (except your /content directory) with the new ones from the download.
From the Panel:
Update your »Site Options« by filling in the new »ePub Metadata« section.
Walk through all your chapters/articles and resave them.
Changed files
M       assets/css/main.min.css
M       assets/css/main.min.css.map
M       assets/css/panel.min.css.map
D       assets/js-source/components/core.js
M       assets/js-source/components/dropdown.js
A       assets/js-source/components/navigation.js
A       assets/js-source/components/oembed.js
A       assets/js-source/components/platform.js
A       assets/js-source/components/print.js
M       assets/js-source/components/sidebar.js
M       assets/js-source/components/theme.js
D       assets/js-source/jquery-2.1.4.js
M       assets/js-source/main.js
D       assets/js/jquery-2.1.4.min.js
D       assets/js/jquery-2.1.4.min.js.map
M       assets/js/main.min.js
D       assets/js/main.min.js.map
M       assets/scss/_trumps.fontawesome.scss
A       assets/scss/_trumps.nprogress.scss
M       assets/scss/main.scss
M       bower.json
M       composer.json
M       composer.lock
M       gulpfile.js
M       kirby
M       package.json
M       panel
D       site/blueprints/article.php
A       site/blueprints/article.yml
D       site/blueprints/chapter.php
A       site/blueprints/chapter.yml
D       site/blueprints/error.php
A       site/blueprints/error.yml
D       site/blueprints/home.php
A       site/blueprints/home.yml
D       site/blueprints/include.php
A       site/blueprints/include.yml
D       site/blueprints/includes.php
A       site/blueprints/includes.yml
D       site/blueprints/printable.php
A       site/blueprints/printable.yml
D       site/blueprints/replacements.php
A       site/blueprints/replacements.yml
D       site/blueprints/site.php
A       site/blueprints/site.yml
D       site/blueprints/sitemap.php
A       site/blueprints/sitemap.yml
M       site/config/config.php
M       site/fields/color
M       site/fields/markdown
M       site/fields/selector
M       site/languages/de.php
M       site/languages/en.php
M       site/models/base.php
M       site/models/printable.php
A       site/plugins/epub-exporter/epub-exporter.php
M       site/plugins/helpers/helpers.php
A       site/plugins/hooks/hooks.php
D       site/plugins/oembed/oembed.php
M       site/plugins/theme/theme.php
M       site/snippets/book.php
M       site/snippets/book/header.php
M       site/snippets/book/page.php
M       site/snippets/book/print.php
M       site/snippets/footer.php
M       site/snippets/header.php
M       site/snippets/navigation/item.php
A       site/tags/embed.php
A       tasks/css.js
A       tasks/js.js
M       vendor
Please note: this list contains files and folders that may only be included in the Developer Edition of kirbyBOOK.
6. Getting further help
You're stuck? Can't figure out all the things? No worries! You can always:
Use the contact form in the bottom right corner of this page to send an inquiry
Send a quick tweet to @DieserJonas (short questions only!)
FAQ
Broken subpages
Visiting your home (or "Introduction") page works great, but trying to visit any subpage shows a blank page or even leads to a server error? Please make sure that you:
Included the (hidden) .htaccess file when uploading / moving the kirbyBOOK files
Updated your RewriteBase setting according to your setup.
If you're running kirbyBOOK at the root of your domain try enabling the RewriteBase in your .htaccess file like so:
RewriteBase /
If you're running kirbyBOOK in a subfolder, make sure to set the RewriteBase according to the name of your subfolder:
RewriteBase /my-subfolder
Broken content after saving
If your site displays the initial demo content just fine but breaks as soon as you try to save your own content changes or your content files (within the /content directory) look broken this might be an issue with a missing PHP extension.
To handle text correctly, kirbyBOOK uses the mbstring extension. While this comes preinstalled with 99% of hosting providers there might be situations where this is missing. Try contacting your hosting provider and kindly ask them to enable that essential extension for you.